If you buy via a link on this page, we may receive a commission, at no extra cost to you.Learn more
Fishing lures, just like all fishing equipment, need to be maintained. Over the years, you will accumulate an impressive selection of fishing lures. Fishing lures can be expensive. We need to help lures survive the test of time. A clean, well, maintained fishing lure can last a lifetime. A dirty, ignored fishing lure will fail at the worst possible moment.
Is it possible to keep fishing lures clean and functioning? Yes, it is. Take a little time and effort, and your fishing lures will have more longevity and remain effective.
If you want to save time and money, read on. I would rather be on a lake or river than spend unnecessary dollars in the tackle shop.
Is It A Waste Of Time To Clean Fishing Lures?
No, it is not a waste of time to properly clean fishing lures. To properly function, fishing lures need the following qualities: Movement, vibration, flash, and color. Take away any of these qualities, and fishing lures are less effective. The result will be catching fewer fish.
What Do I Need To Clean And Maintain Fishing Lures?
This will depend on the type of fishing that you do. Saltwater is harsher on fishing lures than freshwater. Bearing both disciplines in mind, here is a list of necessary equipment.
- Small wire brush
- Hook file
- Split ring pliers
- Old toothbrush
- Nail file
- Sandpaper
- Toothpicks
- Rags
- WD40
What’s The Right Way To Clean My Lures?
Fishing lures have been crafted for one purpose- to catch fish. Modern technology allows companies to exact tests on these lures. When you buy a fishing lure, it has been crafted to mimic small fish or insects. Sand, salt, rust, and mud will hinder the lure’s ability to catch fish. After a day of fishing, it is important to examine lures.
Here are eight steps to caring for your lures before you tuck them away in your tackle box.
Step 1: Dry Off Your Lures
Before putting your lures in the tackle box, they must be completely dry. If salt-fishing, the lure must first be washed off with fresh water. This is an important step that cannot be ignored. After washing, take a rag and dry the lure thoroughly. Never put a wet lure into a tackle box. Store your lures in separate compartments within the tackle box. Never store lures beside rusting metals.
Step 2: Remove Hooks And Split Rings
We need to give our lures a thorough inspection. Do this once you are at home. Working with lures can be dangerous. It is best to remove all hooks before cleaning the lure.
Remove the hooks and split ring using the split ring pliers. Examine the hooks and split rings. If they are rusting, then replace them. Hooks and split rings are inexpensive to replace. If the hooks and split rings show no sign of wear, use the hook file to sharpen the hooks. Set the hooks and split rings to the side. At the end of the process, we will replace them.
Step 3: Rinse Using Warm Water
Rinse the lure in the kitchen sink under warm water. This will help to remove any sand or grit. This should be done prior to scrubbing. If you scrub before rinsing, you could cause irreparable damage to the lure. The paint and clearcoat can become scratched from particles of grit.
After an initial rinse, examine the lure. Check for any remaining particles of grit. If necessary, rinse again. Do not scrub or rub the lure at this point. Any stubborn grit should be removed gently with a toothpick.
Step 4: Clean The Lure With Soap
Once you are satisfied that no grit remains, it’s time to give the lure a deep clean. I like to use baby soap as it is less harsh than dish soap. Wet the rag under warm water and apply soap. Gently rub the lure to remove any grime. Rinse the lure and check it using your fingers. If any grime remains, repeat the process.
Step 5: Clean With A Toothbrush
Wet the toothbrush and apply soap. Use the toothbrush to reach hard to get to areas. Be gentle, as you could cause damage to the lure. Clean areas using a circular movement. Rinse off the soap and inspect the lure. If there is still dirt or grime, repeat the process.
Step 6: Dry Off And Reassemble
Use a dry rag to wipe off and dry the lure. Make sure to get into all the nooks and crannies and get rid of any moisture. Reassemble the lure with the split rings and hooks. I like to finish with a small amount of beeswax. Beeswax is a natural product and, once buffed, will give the lure a nice sheen.
These steps are for the basic care of lures. Corroded or damaged lures will require more labor and attention.
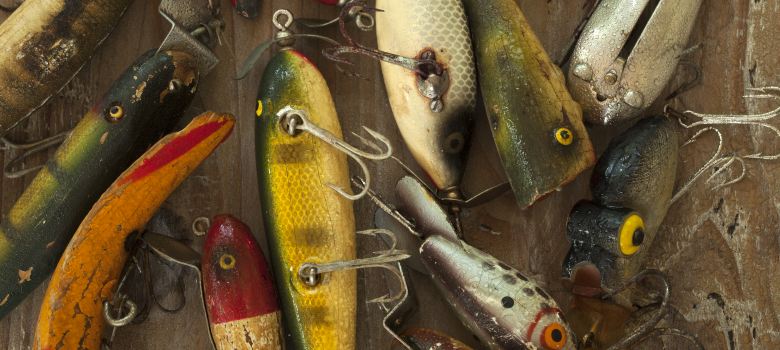
Step 7: Remove Rust And Corrosion
Sometimes rust just won’t budge, or you have ignored the lure for too long. Don’t worry, though; we can sort that out. After removing the hooks and split rings, we are going to emerge the lure in a mixture of vinegar and water. Mix one part vinegar with two parts water. Place the lure in the mixture and leave it for 24 hours. Rinse the lure off and wipe it dry. Any remaining rust can be removed with sandpaper or a nail file. Use the wire brush to gently remove rust from hard to get to spots.
If the rust is more stubborn, we can use WD40. This is usually my last resort. Spray the affected area with WD40 and let it soak in a plastic container for two hours. Thoroughly wash the lure with soap and water and dry. It is illegal, in many states, to fish with lures that have been sprayed with WD40. If the lure has lost color, try to match it as best you can. Let it dry, and finish with a light coat of epoxy resin. Adhesive foil can also be used. Use the lure as a template. Draw around the lure and cut the shape. Now peel the foil and apply it to the lure. Finish with epoxy resin and allow to dry for 24 hours. Apply beeswax and buff. This will leave a more natural smell. Refit with new hooks and split rings, and the job is complete.
Step 8: Feathered Lures
Always keep the packaging that feathered lures came in. These will keep out bugs that can eat them. When you are finished fishing, rinse off and dry the lure. Once the lure is completely dry, return it to the packaging. Store the lure in a tackle box in an area without humidity.
A Word Of Caution
Tetanus is a dangerous disease that causes painful muscle contractions. It can interfere with the ability to breathe, eventually causing death. Before working with rusty hooks, ensure your tetanus vaccine is up to date.
Final Thoughts
I love to find old fishing lures. Whether they are hanging in a tree or a body of water, it is important to remove them. Lures can cause serious injuries to both humans and wildlife. To me, finding a lure and restoring it, is a blessing. It does not take up a lot of time, and you have the joy of catching fish with something you did not pay for. Sometimes my friends clear out their tackle boxes. I took everything that they were going to put in the trash can. A couple of weeks later, I returned some of the lures, refurbished, to my friends. They are always both amazed and delighted. Happy Fishing.